Build your first scenario — a lane change from scratch
यह कंटेंट अभी तक आपकी भाषा में उपलब्ध नहीं है।
This tutorial builds a complete scenario from an empty canvas: a vehicle drives along a two-lane road, speeds up, then changes into the right-hand lane. It ends with a PASS verdict.
Everything happens in the browser. Open drawtonomy.com and follow along.
1. Draw a two-lane road
Section titled “1. Draw a two-lane road”You start in Scene mode, where the drawing tools live.
- Press N for the Lane tool.
- Click on the left of the canvas to drop the first centerline point, click again far to the right, and press Enter.
Make it long — draw the centerline wider than the visible screen. An actor that reaches the end of the road simply stops there; if that happens during a run, extend the road and press play again.
Now add the second lane:
- Press V for Select and click the lane you drew.
- In the attribute panel, find the RIGHT LANE section and click Create.
Create generates a new neighbouring lane; Set points at a lane that already exists. See Manage lane connections for the details.
2. Switch to Scenario mode
Section titled “2. Switch to Scenario mode”Open the hamburger menu at the top left. Under the EDITING heading, click Scenario.
The drawing toolbar is replaced by a short one — Undo, Redo, Hand, Select, Add actor, Path — and the LOGIC card docks to the bottom of the screen.
3. Add an actor
Section titled “3. Add an actor”- Click Add actor in the toolbar.
- The placement panel opens with TEMPLATE and COLOR rows. Six templates are shown; More… expands the list to all 48 (sedans, trucks, buses, motorcycles, bicycles, pedestrians, and more).
- Tick Set initial speed and leave SPEED at
8.33m/s if you want the vehicle rolling from t=0. - Click on the left-hand lane, near its start.
The vehicle appears under ACTORS as Vehicle1. That name is the
entity name that ends up in the exported .xosc, so rename it here if
you care about the output.
The panel also has an Edit roads button at the top — that is the shortcut back to Scene mode if you need to change the road.
4. Create the first phase
Section titled “4. Create the first phase”Click + Phase.
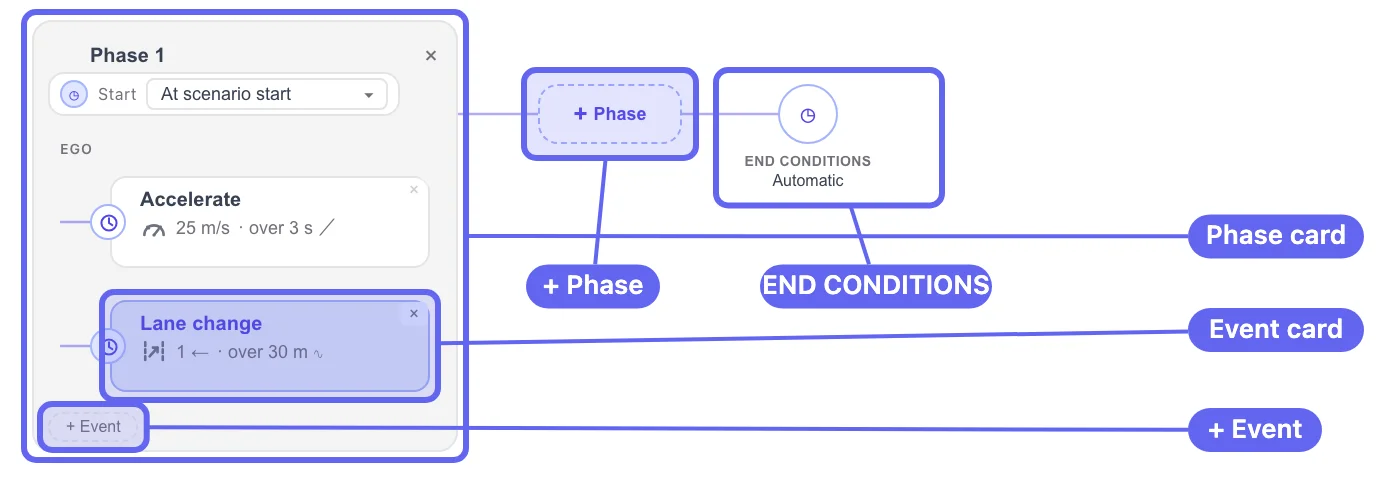
One click gives you more than a phase. drawtonomy creates:
- Phase 1, containing a row for
VEHICLE1, - Event_1 inside that row, already carrying a default
Change Speed action of
8.33 m/sover time2.00 s, - a default TRIGGER of Simulation time
0.00 s, - and the event editor, opened on the right.
So the first event is not something you add — it is something you edit.
5. Make the first event accelerate at t = 2 s
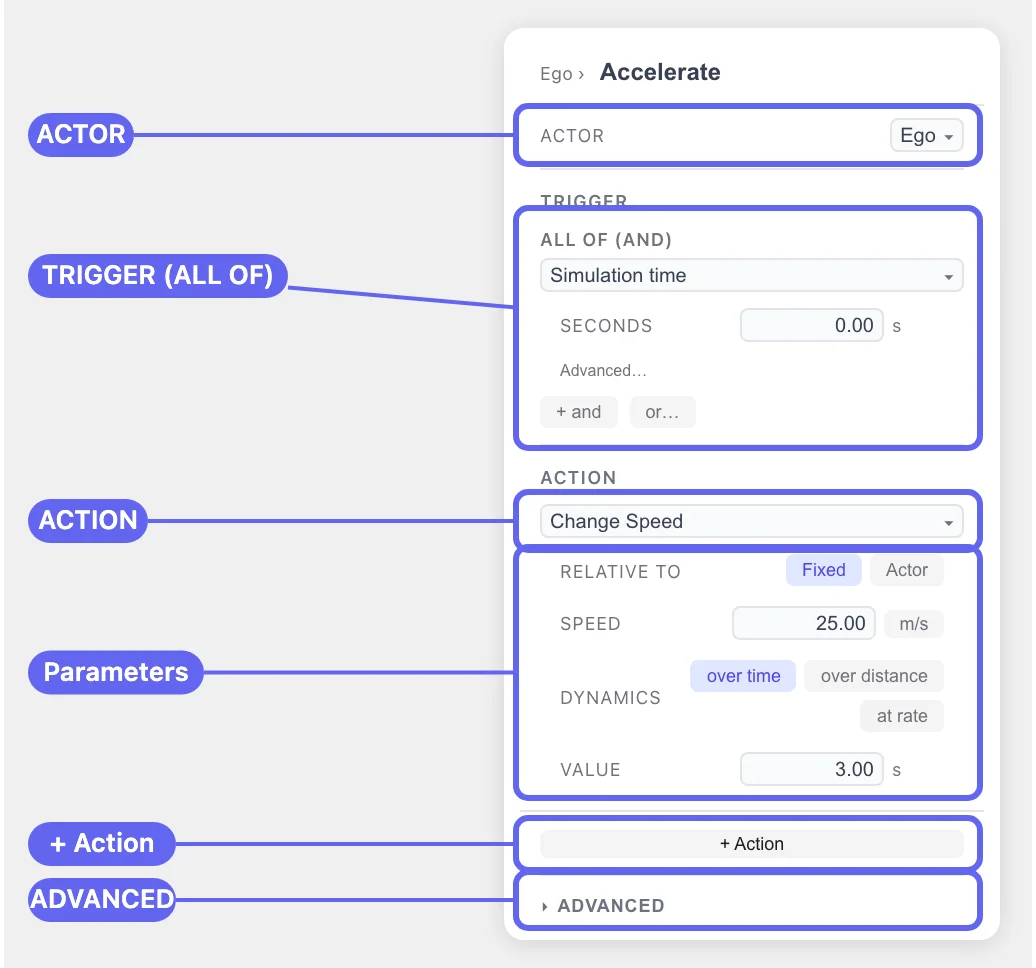
Section titled “5. Make the first event accelerate at t = 2 s”In the event editor:
- Under TRIGGER, the preset is Simulation time. Set
SECONDS to
2.00. - Under ACTION, the preset is Change Speed. Leave
RELATIVE TO on
Fixed, set SPEED to8.33m/s, and leave DYNAMICS onover timewith VALUE2.00 s.
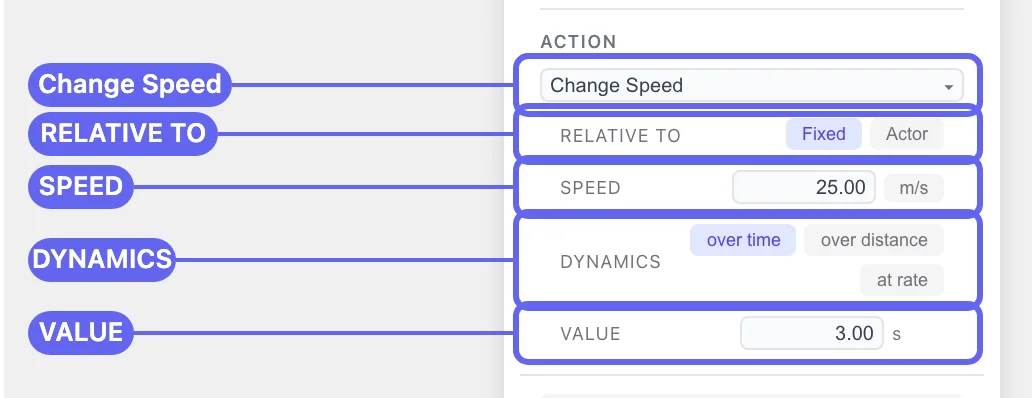
Read it as one sentence: two seconds into the run, Vehicle1 reaches 8.33 m/s, taking two seconds to get there.
The event card in the graph now summarises itself as
8.3 m/s · over 2 s.
6. Add the lane change event
Section titled “6. Add the lane change event”Click + Event in the VEHICLE1 row. Event_2 appears with the
same defaults as Event_1 — including a trigger at 0.00 s.
Change it into a lane change:
- Set the TRIGGER’s SECONDS to
5.00. Do this first. Two events that both trigger at0.00 sfire at the same moment, which is rarely what you want. - Open the ACTION dropdown and pick Change Lane from the COMMON group.
Change Lane starts with TARGET set to Same lane and
REFERENCE set to the actor itself, so the editor immediately warns
you:
⚠ Change Lane target is the actor’s own current lane — no lateral movement will occur.
That warning is expected. Fix it:
- Set TARGET to
Right. A NUMBER OF LANES field appears — it only exists forLeftandRight. Set it to1. - Leave REFERENCE on
Vehicle1.Rightis relative to the reference actor’s current lane, so referencing itself means “one lane to my own right”. - Leave DYNAMICS on
over distancewith VALUE30.00 m.
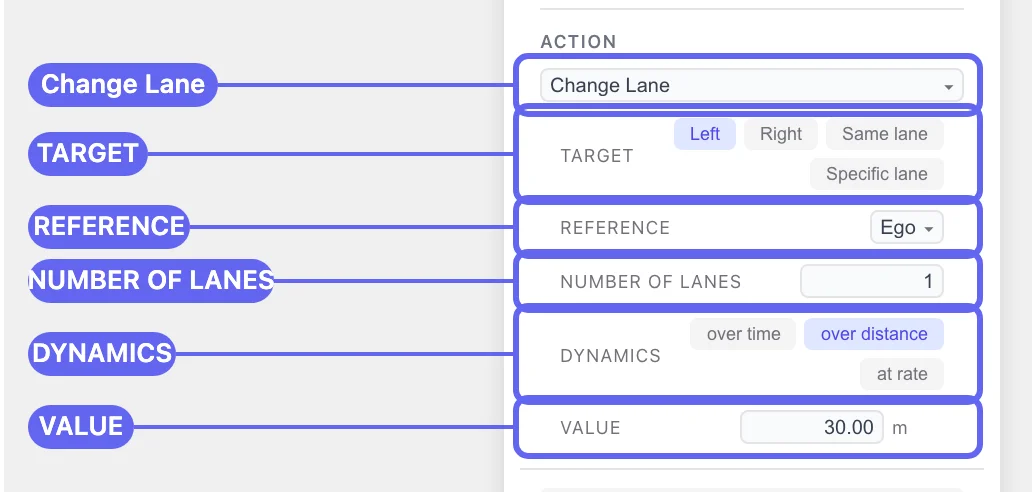
The warning disappears and the card summarises as 1 → · over 30 m.
7. Run it
Section titled “7. Run it”Press the ▶ button at the left of the LOGIC card.

While the run is in progress:
- The verdict badge goes from
IDLEtoRUN, and toPASSwhen the scenario finishes without triggering a fail condition. - The time readout counts up, and the timeline fills with one block per actor plus a marker where each event starts.
- Follow: Off is the default camera. Switch it to Follow: Vehicle1 if the vehicle drives out of view.
At around t=2 s the vehicle accelerates; at around t=5 s it slides
one lane to the right over 30 m. The END CONDITIONS node is set to
Automatic, so the run stops once every event has finished.
Made a mistake? Ctrl+Z, or the ↶ button in the toolbar, undoes edits to the logic graph — including a deleted phase.
Your work is saved automatically
Section titled “Your work is saved automatically”You never had to press “save”. drawtonomy keeps your scene, your scenario, and any imported OpenDRIVE map in the browser as you work, and restores them the next time you open the tab. When it restores a session it shows a Restored previous session banner — click Start fresh on it to begin from a blank canvas instead.
Because this lives in the browser, it is not a way to share or
archive a scenario. For that, Export the .xosc and .xodr below.
8. Export
Section titled “8. Export”Hamburger → Export:
- OpenSCENARIO (.xosc)… — the scenario you just built.
- OpenDRIVE (.xodr) — the road it runs on. A
.xoscis not playable without it. - Video (.webm)… — record the run as a video file.
The exported pair opens in esmini and in other OpenSCENARIO 1.x tools. See Export OpenDRIVE + OpenSCENARIO.
What you learned
Section titled “What you learned”- Roads and actors belong to Scene mode; behaviour belongs to Scenario mode.
- + Phase creates a phase, a first event, a default action, and a default trigger in one click.
- An event is one TRIGGER plus one or more ACTIONS.
- Change Lane needs TARGET set to
LeftorRightbefore it moves anything.
What’s next
Section titled “What’s next”- Phases and events — the structure behind the graph, and what runs when.
- Actions reference — the other 33 actions.
- Triggers reference — conditions beyond simulation time.
- End and fail conditions — turn the run into a PASS / FAIL check.
- Open and play an existing .xosc — start from someone else’s scenario instead.
- AI generation — describe a manoeuvre like this one in words and get a verified scenario back.